So often I get clients with dark hair who want to be platinum and there is so much confusion for them about the process. I'm going to go over some thing to keep in mind or give light on!


1- It's a process. Slow and steady wins the race.
I know people hate when their hair stylist says that but it's not just us being mean or lazy. Unless Olaplex is being used, lightening your hair more than 5 levels in one sitting will flare open your hair strands causing breakage and weak hair. The amount of lift you desire is how you choose which developer to mix with the bleach. If you are trying to lift 5-7 levels, you will have to use a higher volume developer (30 or 40) But, if you go in your first time with a 10 or 20 volume developer, it will take longer but your hair will still keep its shine and won't damage it that much. If you are going to go blonde, you want it to be pretty blonde, not like a fried frizzy brassy mess.
Like this.
Even breaking it up into two sessions 2 weeks apart would be so much better for your hair than trying to achieve your goal in one sitting.
Some examples- highlights vs double process. Highlights usually get blonder faster because of the heat you get from foils it adds to the acceleration of bleach to process more evenly from root to ends.
2- Levels of lift.
Another reason not to go from black or dark brown to blonde in one sitting- besides the damage it causes is sometimes it just won't do it in one sitting! Each hair color has underlining pigments which make each color possible. You can't have brown hair without having red as the underlining pigment, you can't have light brown hair without orange as the underlining pigment, you can't have blonde hair without yellow being the underlining pigment. That's just how hair is! When you are lifting the color of your hair, it has to go through all the stages of lift. Darker colors it will start off a red, then most of the time get to an orange or a yellow-orange then stop. After applying the bleach to your hair, it expands and dries out after about an hour. So whatever it lifts to in an hour is what you are dealing with for your first session. That's usually the brassy orange horrible color that people always end up with when they do their hair at home.
Luckily for hairstylists, we know how to cancel out the underlining pigments but keep the hair at the same level of lift. The process is called toning. It's usually done at the shampoo bowl. By going across the color wheel you can cancel out unwanted tones. So if you have orange hair, we apply a color at the level of lift you are with blue underlining pigments, if your hairs yellow we apply a color with violet pigments. (Hence, purple shampoo) That way your next session, you are already starting at an orange so it can get to the blonde (yellow or pale yellow) a lot faster.
SIDE NOTE-- When you bleach your hair, since it's lifting out all the underlining pigments in your hair strand, you won't be able to just throw a dark brown on top of blonde. You have to fill the hair back with the missing pigments or it will look muddy and washed out. So if you think Oh I'll just try bleaching my hair at home and if it looks bad just dye it dark brown, think again, because it's another expensive process to do a color correction. Sometimes will cost just as much going to your desired blonde level- so really think about the decision to go blonde because it is expensive to get there and go back dark.
3- You need to adjust your products you use on your hair.
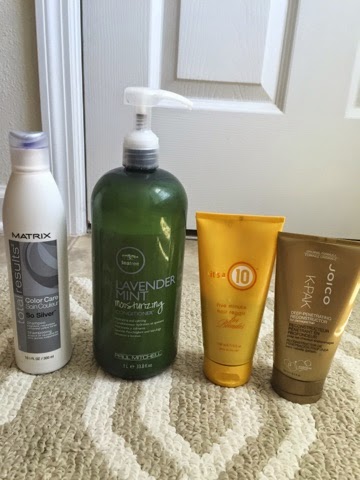
While using a regular color safe shampoo and conditioner like you have been doing isn't BAD for your blonde hair, you will have different maintance than you did with dark hair. Just like how color fades on dark hair, blondes will "yellow" over time because toners fade just like colors do. So you will need some sort of purple shampoo to use once a week. The purple acts like a toner and will cancel out brassy hair, brighten your blonde and add shine. There are many different brands of purple shampoo, one I would recommend is So Silver by Matrix. You will also need a good deep conditioner. Bleach flares open your hair strands so you need something to put moisture back into the hair. A conditioner I would recommend for just regular use is the Tea Tree Lavendar Mint Moisturising Conditioner. And a deep conditioner to be used once a week I would recommend is Its a 10, 5 Minute Hair Repair or Joico K-Pak Deep Penetrating Reconstructor.
4- It's expensive.
Everyone wants great results obviously. So after two full heavy highlights and buying products you need to upkeep the color, you also have to come back in once a month to get your new growth touched up. Nothing is worse than the trashy black roots blonde hair! A good alternative to the high maintance or maintaining the blonde is to do an Ombre or Balayage highlights where a color close to your natural is at the base and then it fades into the blonde, that way you won't be able to notice when it grows out. You can let that go a few months without touching it up if you use a purple shampoo and proper products to keep the blonde bright!
5-Figure out what shade of blonde would look best with your skin tone.
For some reason everyone always says "platinum" when they want to go blonde. If you have olive skin tone where you tan easy, pretty much any color blonde will look good, but if you are really pale, you never want a hair color lighter than your skin or it will make you look washed out. If you have cool skin tones (blue eyes, freckles, pink tones in your skin) going with a cool or "ash" blonde would look best, maybe just a darker ash blonde instead of platinum. For the warm skin tones, a gold blonde always looks pretty or a neutral blonde where there is neither ashy or gold tones to it. It's good to think this over before the process, because you may have an idea you want white hair, but it may look horrible after you get it! It helps to look up pictures of girls with similar features as you to see what would look best.
Here's an example of a golden blonde on warm skin tone-
Here's an example of cool/neutral blonde on a warm skin tone-
Here's an example of a cool skin toned girl with hair that is also too light and washes her out.
6- Summer Disasters.
Chlorine WILL turn super blonde hair green! If this happens you will need to get a clarifying shampoo like Paul Mitchell Shampoo Three or go see your stylist! I've heard soaking your hair in tomato sauce works to get it out, though I have never tried it.
7- Make Dry Shampoo your best friend.
Okay guys, I have just discovered the dry shampoo and how amazing and beneficial it is! So after you get pretty blonde, your hair takes FOREVER to blow dry, plus the more frequently you wash your hair, the faster your toner fades = yellowing hair. And the more you wash your hair the more you have to use heat tools like blow dryer and flat iron. Most of the time blonde hair will not need to be washed for a few days anyways because of the lack of moisture, but your new growth area will naturally get oily from your scalp producing oil. GET A DRY SHAMPOO! Can't stress this enough! I got the Baltise for blonde/light hair at Marshalls for $5.99 and it's going to save me so much money on my shower hair products! It smells fresh and you spray all over your root area that's oily, massage with your fingers into your hair then BAM looks like freshly washed hair!! I'm obsessed it is so good for everyone to use! Plus, then you are allowing your oils to stay in your hair which will help your hair get stronger.
Hope this helps! I'll add tips as I think of them but this covers the main issues. :)


